Skip to content
RT_E2_Logo

SUSPENSION & ENGINES

  • SEARCHES
    • Product Search
    • DVS Valving Search
    • Spring Rate Search
    • TNK Fork Tube Search
    • Instructions Search
    • Basic Setup Search
    • Engine Search
  • PRODUCTS
    • Suspension
    • Engines
    • Lubricants
    • Tools
      • Fork Tools
      • Shop Tools
      • Shock Tools
      • Dyno Mounts – CTW and Roehrig
      • Engine Tools
    • RT Merch
    • Stickers-Banners
    • Suspension Bible
    • Vintage (pre-2000)
  • SERVICES
    • Suspension
    • Engines
    • Brake Arcing
    • Race Tech Centers
  • ABOUT
    • About Race Tech
    • Contact Us
    • RT Policies
    • Rider Support
  • RESOURCES
    • Instructions
    • Service Request Forms
    • Shipping
    • Contact Us
    • Suspension Bible
    • Mental Edge Video
    • Seminars
    • Downloads
  • LOGIN
  • CART
PRODUCT SEARCH
DVS VALVING SEARCH
SPRING RATE SEARCH
ENGINE SEARCH

8.1  Maico External Fork Springs

    Early 1970s

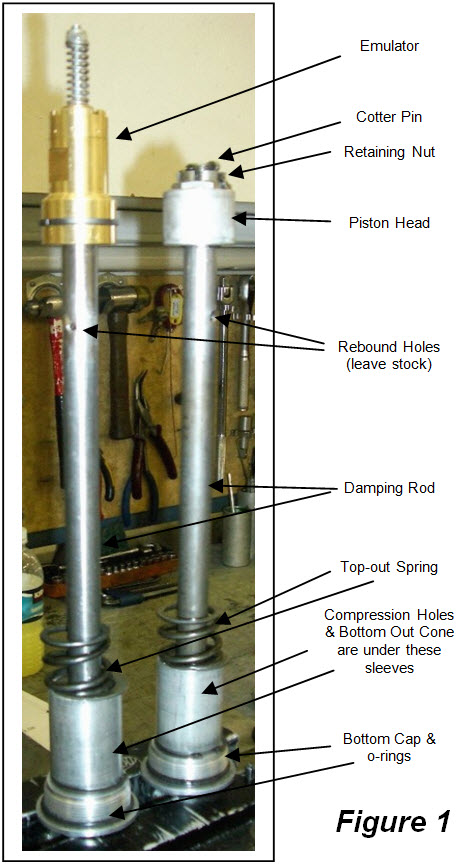
In the early 1970s Maico was considered to be one of the best handling motorcycles in the world. The MX bikes had some of the first leading axle forks. They also had external fork springs. This is the only real difficulty to customizing these forks today.

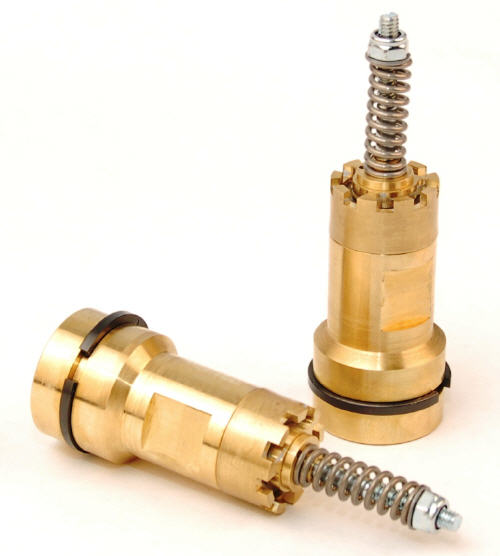
Normally Emulators sit on top of the damping rod and are held in with the fork spring. Not so with this fork. Fortunately the solution is a specifically designed Emulator that threads onto the top of the damping rod.

The damping rod unscrews from the bottom of the fork leg.

Sorry we don't have better pics for these forks. If you'd like to help us with this little problem please call.Remove the piston head from the Damping Rod;

Remove the cotter pin & discard. Using a wrench or socket unscrew the top from the damping rod. You may need to use a vise with soft jaws or a shaft holding tool TFSH 32 to hold the damping rod. NO VISE GRIPS!

Remove the circlip from the damping rod, it will not be required with the Gold Valve Emulator.

Modify the Damping Rod by drilling the existing compression holes at the bottom of the damping rod to 1/4 inch (6 mm) and add two additional 1/4“ holes so you end up with four compression holes (2 sets of 2 holes).

When drilling new holes, space them axially (lengthwise) at 10 mm (7/16") increments.  Each set of two holes must be perpendicular to the last set so as not to weaken the rod. 

After drilling, chamfer and deburr the compression holes, inside and out.  NOTE: Do not add or enlarge the rebound holes at the top of the damping rod and leave their edges sharp if any exist.

Trim down the top edge of the Bottoming Cone just enough to expose the lower compression holes.

Make sure to deburr and chamfer the new edge after cutting.

Install the Emulator.

Be sure to setup the Emulator valving according to the DVS Setup Sheet.

Thread the Emulator assembly onto the damping rod, apply red loctite to the threads. Use the flats on the Emulator to tighten securely, DO NOT OVERTIGHTEN! 

Install the fork fluid.  Bleed the fork by pumping it.  Set the oil level with the fork completely bottomed. Fill to the top of the ridge where the fork inner narrows down, this is a good starting point.

See Standard Emulator Instructions.


RT_E2_Logo

951.279.6655

info@racetech.com

1501 Pomona Rd. Suite 101
Corona, CA 92878

STOP! Include Service Request Form when shipping components to Race Tech.

twitter link facebook link instagram link

© 2025 Race Tech. All Rights Reserved

  • Downloads
  • Dealer Application
  • Policies
  • Cookie Policy (EU)
Race Tech
We Respect Your Privacy
To provide the best experiences, we use technologies like cookies to store and/or access device information. Consenting to these technologies will allow us to process data such as browsing behavior or unique IDs on this site. Not consenting or withdrawing consent, may adversely affect certain features and functions.
Functional Always active
The technical storage or access is strictly necessary for the legitimate purpose of enabling the use of a specific service explicitly requested by the subscriber or user, or for the sole purpose of carrying out the transmission of a communication over an electronic communications network.
Preferences
The technical storage or access is necessary for the legitimate purpose of storing preferences that are not requested by the subscriber or user.
Statistics
The technical storage or access that is used exclusively for statistical purposes. The technical storage or access that is used exclusively for anonymous statistical purposes. Without a subpoena, voluntary compliance on the part of your Internet Service Provider, or additional records from a third party, information stored or retrieved for this purpose alone cannot usually be used to identify you.
Marketing
The technical storage or access is required to create user profiles to send advertising, or to track the user on a website or across several websites for similar marketing purposes.
Manage options Manage services Manage {vendor_count} vendors Read more about these purposes
View preferences
{title} {title} {title}
Scroll To Top